
1. S3 Storage
By default uploaded files are stored in the local disk of the machine where the tool is running. However, tool gives you the option to store uploaded files into S3 storage as well. Few customers might not want to store the uploaded files in the local disk, due to space limitation and availability concerns.
If you have the tool installed across multiple server instances behind a load balancer then it’s mandatory to store the uploaded files into s3 storage. Tool provides option to share the generated report between users. Say suppose a user uploads file into server instance#1. Seconds user tries to access the same generated report. Load balancer could route his request to server instance #2. In such circumstance seconds, user will experience HTTP 404 error if files are stored local disk.
Here are the two simple steps to store the uploaded files into S3 storage:
1. Create a file by name: ‘storage.xml’ and place in the root folder where the application is installed.
2. In ‘storage.xml’ insert the s3 bucket name, access key, secrete key as shown in the below format:
<?xml version="1.0" encoding="UTF-8"?>
<!DOCTYPE properties SYSTEM "http://java.sun.com/dtd/properties.dtd">
<properties>
	<comment>Storage Configurations</comment>
        <entry key="s3.endPointURL">https://s3.us-west-1.amazonaws.com</entry>
        <entry key="s3.region">us-west-1</entry>
	<entry key="s3.bucketName">my-bucket</entry>
	<entry key="s3.accessKey">my-access-key</entry>
	<entry key="s3.secreteKey">my-secrete-key</entry>
</properties>
2. SAML Authentication
Here are the steps to enable SAML authentication:
1. In the root folder, you will find ‘saml-template.xml’ configuration file. Rename this file to ‘saml.xml’.
2. In the same saml.xml configure the Identify Provider properties.
3. Based on your java version, download jce-6 or jce-7 or jce-8, unzip it, and drop its content at ${java.home}/jre/lib/security/
4. On the SAML server specify the ycrash destination URL as https://<YC_HOST>/saml-acs.jsp
3. Dashboard
Here are the steps to enable Dashboard:
1. Download and install Mysql 5.7
2. To activate Dashbaord you need special license key. This key should have been sent to you in the email. Place the license key file (license.lic) in the folder where tier1app tools are installed.
3. Now you need to create database tables required by GCeasy. Script (ddl_01.txt) to create database tables should be sent in email. Execute following statement from command prompt:
mysql -uroot -p < ddl_01.txt
You will be prompted to enter password. Enter the password for your database.
4. Now create a file called connector.xml, specifying database connectivity details. Below is the connector.xml template file:
<?xml version="1.0" encoding="UTF-8" standalone="no"?>
<!DOCTYPE properties SYSTEM "http://java.sun.com/dtd/properties.dtd"><properties>
   <entry key="JDBC_URL">jdbc:mysql://DB_HOST_NAME:DB_PORT/gceasy</entry>
   <entry key="JDBC_USER">DB_USER_NAME</entry>
   <entry key="JDBC_PASSWORD">DB_PASSWORD</entry>
</properties>
4. Overriding domain name in Share Report URL
From the GCeasy, FastThread, HeapHero users can click on the ‘Share Report’ option. It will generate a report’s URL. This URL can be shared among team members. If you are running the tool in the ‘hostname1’ on ‘8080’, then generated URL will be of format: ‘http://hostname1:8080/my-gc-report.jsp?….’
However in some enterprises you might be running tool behind webserver, Load Balancer which might be mapped to a different domain name. Example: ‘gceasy.mycompany.com’. In this circumstance you would like the generated URL to look like: ‘https://gceasy.mycompany.com/my-gc-report.jsp?….’
This feature is supported by adding system property ‘appURLPrefix’ in the launch-*.sh script.
Say suppose your current ‘launch-gceasy.sh’ is looking like this:
java -Xmx2g -DuploadDir=. -jar webapp-runner-8.0.33.4.jar --port 8080 gceasy.war &
Change it to:
java -Xmx2g -DappURLPrefix=https://gceasy.mycompany.com -DuploadDir=. -jar webapp-runner-8.0.33.4.jar --port 8080 gceasy.war &
And then restart the tool. From this point, generated Share URL will look like https://gceasy.mycompany.com/my-gc-report.jsp?..
5. Masking data in HeapHero
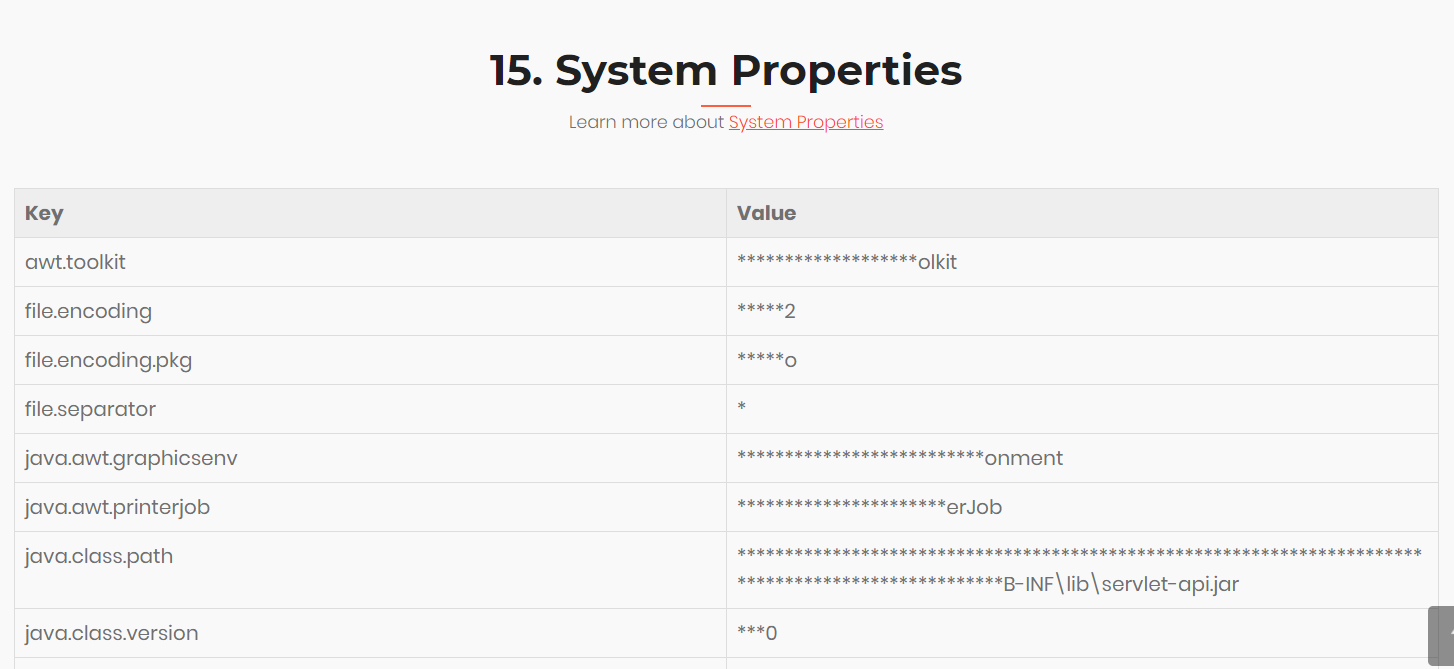
HeapHero report has a ‘System Properties’ section. In this section application’s system properties are printed. Sometimes system properties tend to contain sensitive information like JDBC URL, passwords,… For security reasons, if you decide not to publish them in clear text, we have exposed a feature that can mask the data that is published in the report.
You can achieve this behavior by passing ‘-DmaskData=x%’ property to launch-heaphero.sh script. Here ‘x’ is the amount of text that needs to be masked.
Currently launch-heaphero.sh script looks like this:
java -Xms2g -Xmx24g -Xss40m -DuploadDir=. -jar webapp-runner-8.0.33.4.jar -AconnectionTimeout=3600000 --port 9000 heaphero.war &
To this script, you can pass ‘-DmaskData’ i.e.
java -Xms2g -Xmx24g -Xss40m -DuploadDir=. -DmaskData=80% -jar webapp-runner-8.0.33.4.jar -AconnectionTimeout=3600000 --port 9000 heaphero.war &
When you configure ‘-DmaskData=80%’ property, 80% of value will be masked and printed on the report, as shown in the below image:
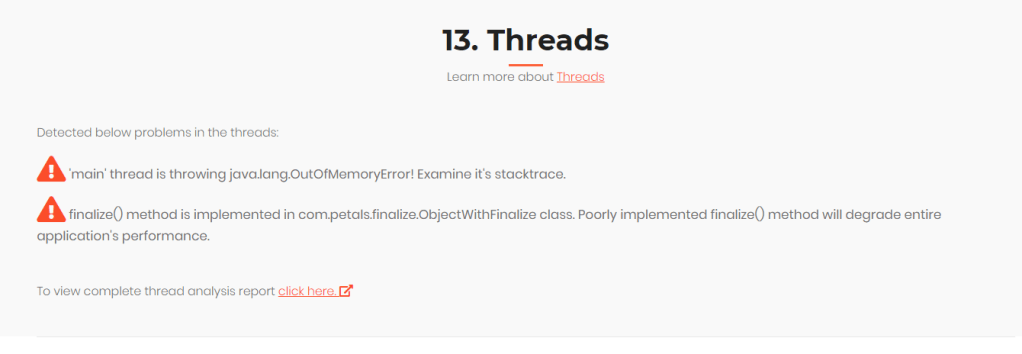
6. Thread dump analysis in HeapHero
Some Heap dumps tend to contain thread dumps with in it. In those circumstances, HeapHero can invoke FastThread (thread dump analysis tool) to do the thread dump analysis and publish detailed thread dump analysis report. Inorder to do it, you need to launch fastThread server. Say you are launching fastThread Server in http://localhost:8090. Now you need to specify this fastThread server URL in the launch script (i.e. launch-heaphero.sh ) in the -DfastThreadServer system property.
Say your launch-heaphero.sh is looking like this:
java -Xms2g -Xmx24g -Xss40m -DuploadDir=. -jar webapp-runner-8.0.33.4.jar -AconnectionTimeout=3600000 --port 9000 heaphero.war &
You need to add ‘-DfastThreadServer’, example:
java -Xms2g -Xmx24g -Xss40m -DfastThreadServer=http://localhost:8080 -DuploadDir=. -jar webapp-runner-8.0.33.4.jar -AconnectionTimeout=3600000 --port 9000 heaphero.war &
Now you will see thread related errors reported in HeapHero as shown below:
7. Key Registry
In Enterprise Edition GCeasy, FastThread, HeapHero, ycrash APIs are invoked with one global api key. If you are planning to roll-out our service enterprise-wide, you might want to give unique api key for each organization in the enterprise. This approach will provide you with more granular control. If you decide to grant access or revoke an organization from accessing the service, then this granular control will be of help.
You can define key-registry.xml and drop it in the uploads directory. (uploads directory is defined by the -DuploadDir property in the launch-*.sh script.) key-registry.xml file structure should look like this:
<?xml version="1.0" encoding="UTF-8"?>
<!DOCTYPE properties SYSTEM "http://java.sun.com/dtd/properties.dtd">
<properties>
   <entry key="f094a38e-c3eb-4c9a-8254-f0dd198245cc">org-1</entry>
   <entry key="a094a38e-bd22-4c28-9698-819e3dvb1ea7">org-2</entry>
   <entry key="b13a7988-824a-4177-823b-f0b97cre3920">org-3</entry>
</properties>
In this file, in the ‘key’ attribute, you can define your own unique api key and assign it to each organization. We recommend the api key to be a UUID, but it’s up to you to choose the format. Make sure assigned keys are unique across the organizations.
If you would like to grant access to a new organization, then you will need to add a new ‘entry’ element to the key-registry.xml. If you decide to revoke permissions to any particular organization, then you need to remove that organization’s ‘entry’ from the key-registry.xml file.
Note: This strategy can be used to avoid cross-pollination of data between data centers. Say your application is deployed on two datacenters (San Francisco & London). You have deployed our tool in both the datacenters. You don’t want your servers in San Francisco datacenter to invoke our service running in London datacenter similarly vice versa. Then the above solution can be put in use. You can configure different key-registry.xml for each datacenter.
San Francisco datacenter key-registry.xml might look like this:
<?xml version="1.0" encoding="UTF-8"?>
<!DOCTYPE properties SYSTEM "http://java.sun.com/dtd/properties.dtd">
<properties>
   <entry key="f094a38e-c3eb-4c9a-8254-f0dd198245cc">dc-1</entry>
</properties>
London datacenter key-registry.xml might look like this:
<?xml version="1.0" encoding="UTF-8"?>
<!DOCTYPE properties SYSTEM "http://java.sun.com/dtd/properties.dtd">
<properties>
   <entry key="a094a38e-bd22-4c28-9698-819e3dvb1ea7">dc-2</entry>
</properties>
You need to configure all the servers in the San Francisco will invoke our service with api key “f094a38e-c3eb-4c9a-8254-f0dd198245cc”. Similarly all servers in London datacenter to invoke our service with api key “a094a38e-bd22-4c28-9698-819e3dvb1ea7”. If accidently server from London tries to invoke our service running in San Francisco then it’s request will be rejected.
8. How to enable SSL?
You can configure Enterprise Edition to take SSL traffic only by passing following properties in the launch-*.sh script:
+ keystore file location
+ keystore password
+ ‘–enable-ssl’ flag
Say suppose your current launch-gceasy.sh script looks like this:
java -Xmx2g -DlogDir=. -DuploadDir=. -jar webapp-runner-8.0.33.4.jar --port 8080 gceasy.war &
Change it to:
java -Xmx2g -DlogDir=. -DuploadDir=. -Djavax.net.ssl.keyStore=/opt/https.jks -Djavax.net.ssl.keyStorePassword=password1 -jar webapp-runner-8.0.33.4.jar --port 8080 --enable-ssl gceasy.war &
9. Support Email
Whenever a user is taken to the error page, the application will print ‘If you think this is not a valid error & need resolution, please contact team@tier1app.com‘. Besides that in few other places also the application is printing contact ‘team@tier1app.com‘. We are providing an option to replace this email address with your organization’s custom email address or any team’s name.
Change your launch-*.sh script to include ‘supportEmail’ system property with the value that you want to display as a support email address. Example:
-DsupportEmail=help@xyz.com
So your launch script will start to look like this:
java -Xms2g -Xmx4g -DsupportEmail=help@xyz.com -jar webapp-runner-8.0.33.4.jar -AconnectionTimeout=3600000 --port 8080 yc.war &
10. Headline
The headline feature intends to provide a capability to the Enterprise Edition tool administrators to flash important news/announcements about the tool to their users. Administrators can use this feature to flash announcements such as ‘Tool will be unavailable from 9 am to 10 am on Aug 14 for maintenance purposes,’ OR ‘New Manual upload incidents feature is added’.
In order to activate this feature, launch the tool with ‘headLine’ system property. The value passed in this property will be printed in the headline strip. The administrator should modify the ‘launch-gceasy.sh’ script to add this System property. Say current script looks like this:
java -Xmx2g -DlogDir=. -DuploadDir=. -jar webapp-runner-8.0.33.4.jar --port 8080 gceasy.war &
Then ‘headLine’ system property should be added to it:
java -Xmx2g -DlogDir=. -DuploadDir=. -DheadLine="Tool will be unavailable from 9 am to 10 am on Aug 14 for maintenance purposes" -jar webapp-runner-8.0.33.4.jar --port 8080 gceasy.war &
11. Configuring Eclipse MAT in HeapHero
Heap Hero tool uses its internal parsing engine to analyze the heap dumps. Certain engineers prefer to use Eclipse MAT to analyze the heap dumps rather than HeapHero internal parsing engine. To facilitate them, HeapHero can be configured to use Eclipse MAT for parsing the heap dumps.
HeapHero can parse heap dumps in one of the following 3 options:
1. HeapHero internal engine (or)
2. Eclipse MAT (or)
3. Both HeapHero Internal Engine and Eclipse MAT
To learn how to configure HeapHero in the above-mentioned options, please refer here.

Leave a comment